• Zero budget tips

    Make cool movie effects for very little cash

  • Jim and Heinz

    Jim and Heinz have their own site... here.

  • Golf’s Art club

    Join unstable Genius Golf Thewlis for some art-related fun!

  • Pages

Paul Elliott Website

Paul Elliott (the artist responsible for the animation content here at Blunt Productions) has just put his website back online after months of cyberspace absence. It’s still in its early stages but has more content going up every day. Check it out here www.elliottpaintings.co.uk

Blunt Film Pick: MUTO a wall-painted animation by BLU

Here’s an example of an animation that’s really thinking outside of the box. See  more of the artist’s (Blu) work at his website here: http://www.blublu.org/

Animation: Adding mouths and blinking eyelids to your character.

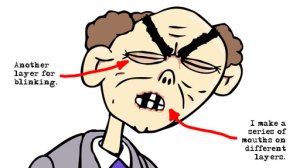
I have one last thing to do before I move my character over to After Effects some extra mouths and some blinking eyelids. I’m going to paint each mouth onto a new layer and the same with the blinking eyelids.

About 5 different mouths are good amount. A small O shape, a large O shape, a wide grin, a large grin and a large open mouth. Experiment until you’re happy. I will be doing a tutorial soon all about mouth shapes so watch out. Tomorrow After Effects here we come.

More about Renderyard.

This weekend we are proud to announce that Blunt Productions are the featured artists at Renderyard. You can see new Blunt content such as Zantrox and Stockbroker (below). Who are Renderyard I hear you ask? Well Renderyard has been established to provide a creative platform for showing experimental film and animation made by emerging filmmakers. They help to produce and distribute short films throughout the country and abroad, and have a yearly film festival held in London.

Check out Blunt Productions page here

Blunt Productions at Renderyard!

Blunt Productions have exclusive content at Renderyard. Not only can you see new to the web Jim and Heinz content such as ‘Zantrox and Stockbroker’ (below) but the Mick Roads short ‘Training Daljinder’ has been chosen as this weeks Video Star.

Check it out here

more about “Zantrox and Stockbroker“, posted with vodpod

Zantrox and Stockbroker

For a limited time, we are proud to offer a sneak preview of ‘Zantrox and Stockbroker’ – the first spin-off from the Jim and Heinz series. This film was made with Marcus Wilding who played Heinz’s Stockbroker in the film ‘Microfinance’ and Zantrox, a robot that was built by Heinz and subsequently had some mental problems due to Jim supplying the wrong size of memory card. Jim still disputes this claim.

Video is now embedded here.

Animation: Outlines and joints on your character in Illustrator.

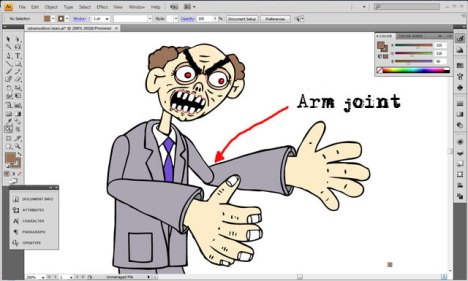
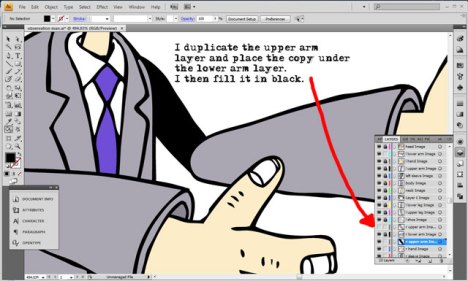
I now have my character all coloured and almost ready to take over to After Effects but one of the problems I am going to have to deal with is where the joints of my character overlap. Let’s take an arm joint as an example. First I start off making a copy of the upper arm layer as this has a black line over lapping the lower arm as you can see below.

Next I move one of the Upper arm layers below the Lower arm. This will be the outline of the Upper arm. I’ve made it all black in the illustration below.

Finally on the Upper Arm  layer which is above the Lower Arm Layer I use the paint bucket tool with the no colour fill option to get rid of the outline around the arm. Now I can see through to the Upper Arm layer below.

Of course you can deal with the whole problem by designing your character in Illustrator from scratch. We shall do that at a later date. Tomorrow I shall be looking at mouth shapes and eye blinks.

New Jim and Heinz London premiere.

Jim and Heinz encounter a small setback in 'Critical Error=True'


The new Jim and Heinz film ‘Critical Error=True’ finally gets its UK Premiere tomorrow at Exploding Cinema‘s end-of-March show at the Cross Kings (in Kings Cross).

The film, which details Heinz’s attempt to track some lost data through the Internet, has been two years in the making and includes the results of extensive research into data storage by director Ben Slotover. This is the first Jim and Heinz to be shot on location in Budapest and parts of rural Hungary, including an abandoned soviet-era radar station which was guarded only by a single, listless, chained-up dog.

There will be a short Q&A with Ben Slotover following the film. Come early to guarantee a seat!

EXPLODING CINEMA
THE CROSS KINGS
126 York Way, Kings Cross,
London, N1 0AX,
Map:
http://www.thecrosskings.co.uk/map.html

Doors 8pm
Show 8:30-2am Just £5 entry!
‘Critical Error=True’ approx. 9pm

Tube & Rail: Kings Cross,

Buses: 91, 73, 205, 214, 63, 71, 10, 30, 45, 46, 73, 259, 390, 476

Live music from Bath based post punk/pop combo HYSTERICAL INJURY

Animation: Adding Colour to your Character in Illustrator.

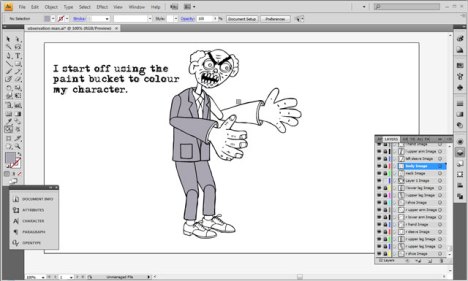
I now have my character outlined and in pieces. Next I want to add some colour. Using the paint bucket tool I’m going to colour my character.

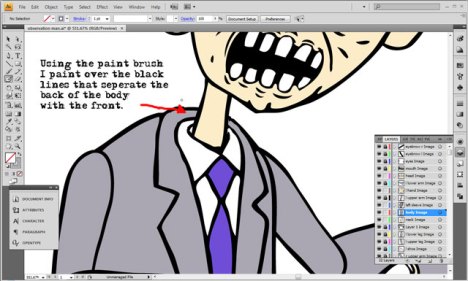
Once I have filled in the character with colour I use the paint brush to paint over the black lines that seperate the backof the body from the front. This is where the neck is sandwiched and gives the appearnce that the body is a whole piece. (See the illustration below)

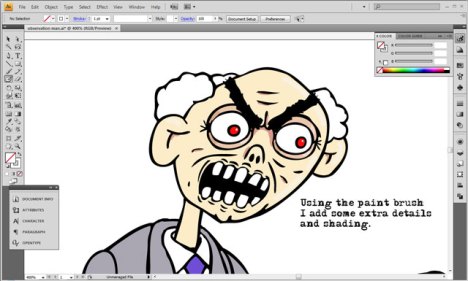
Now I’m going to use the paint brush to add some shading and extra details. I’m doing this mainly around the face. It can really bring your character to life.

Once I finished adding the detail there’s a few little tricks that are needed to make sure the character will animate well when imported into After Effects.


More tomorrow.

Animation: Converting your Character in Illustrator.

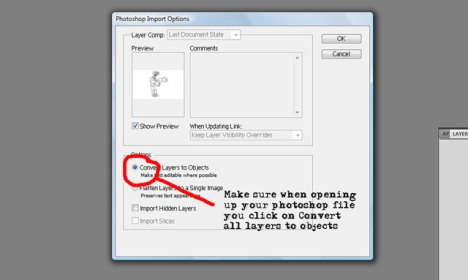
I’m going to convert my Photoshop file into an Illustrator file. So first things first open it up in Illustrator making sure you click on the box which asks ‘Convert all Layers to Objects’.

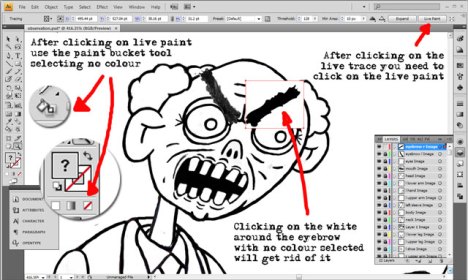
Now I’m going to convert each layer so it will become vector based. I’m going to select one layer to show you how this is done. I’m choosing one of the eyebrows. With it selected I go up to the button on the menu which reads Live Trace. I click on that to convert the layer.

After I’ve done that I want to make the layer editable in Illustrator. On the same menu line to the right there is another button which reads Live Paint. Click on that and now you can use the paint bucket to add colour and other things that I will talk about at a later date.

You’ll notice that at the moment there is a white box around the eyebrow. I want to get rid of that so I’m going to use the paint bucket tool and fill with the no paint choice. Clicking on the white around the eyebrow makes it dissapear. Next I’m going to select all the layer and convert them using ‘live trace’ and then ‘live paint’. Finally I’m going to through all the layers getting rid of the white using the paint bucket tool and the no paint fill.


Here is the finished character all ready to colour which I will do tomorrow.